
Timber frame construction has become increasingly popular due to its sustainability, efficiency, and versatility. One of the critical components of this construction method is the external wall, which requires meticulous detailing to ensure structural integrity, thermal efficiency, and weather resistance. This article provides a step-by-step guide to detailing timber frame external walls, combining best practices with insights from the latest advancements in construction technology. Timber Frame External Wall
Planning and Design
The first step in detailing timber frame external walls is thorough planning and design. This phase involves:
Understanding Building Requirements:
Identify the specific requirements of the project, including load-bearing capacity, thermal performance, and local building codes.
Selecting Materials:
Choose high-quality timber and other materials such as insulation, membranes, and cladding. Opt for materials that provide durability, energy efficiency, and sustainability.
Creating Detailed Drawings:
Produce comprehensive drawings that outline the construction process, including dimensions, joint details, and material specifications.
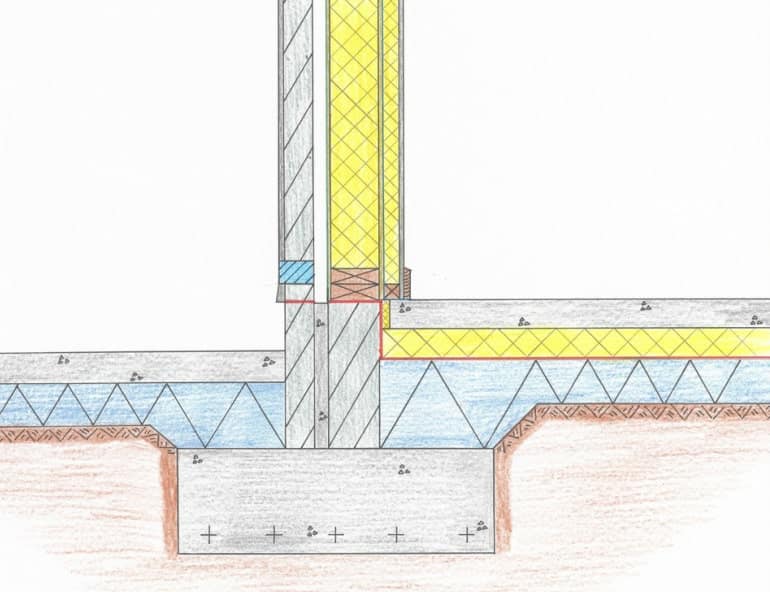
Foundation and Base Plate Installation
The foundation is the backbone of any building, and for timber frame construction, a robust and level foundation is crucial.
Prepare the Foundation:
Ensure the foundation is level, clean, and dry. This may involve using concrete slabs, piers, or strip footings, depending on the project.
Install the Base Plate:
Secure the base plate to the foundation. The base plate serves as the anchor for the timber frame, and it must be treated to resist moisture and decay.
Step 3: Erecting the Timber Frame
With the foundation in place, the next step is to erect the timber frame.
Assemble Wall Panels: Prefabricate wall panels off-site to improve accuracy and efficiency. These panels typically include studs, top and bottom plates, and intermediate noggins.
Install Wall Panels: Lift and secure the wall panels onto the base plate. Ensure each panel is plumb and square, using temporary braces to hold them in place.
Join Panels Together: Use metal brackets, screws, or nails to join adjacent panels. Pay close attention to corner joints and intersections to maintain structural integrity.
Insulation and Membrane Installation
Proper insulation and moisture control are vital for energy efficiency and durability.
Install Insulation: Place insulation within the wall cavities. Common options include mineral wool, rigid foam boards, or spray foam. Ensure there are no gaps or voids to maximize thermal performance.
Apply Weather-Resistant Barrier:
Install a weather-resistant barrier (WRB) over the exterior sheathing. This barrier prevents moisture infiltration while allowing vapor to escape.
Seal Penetrations: Carefully seal all penetrations, such as windows, doors, and utility entries, to prevent air and water leakage.
Cladding Installation
Cladding protects the timber frame from the elements and adds to the building’s aesthetic appeal.
Select Cladding Material:
Choose a cladding material that suits the architectural style and local climate. Options include timber, brick, vinyl, or fiber cement.
Install Battens:
Attach vertical battens to the WRB to create a ventilated cavity behind the cladding. This cavity promotes air circulation and moisture drainage.
Fix Cladding: Secure the cladding to the battens, ensuring proper alignment and spacing. Use corrosion-resistant fasteners to prolong the lifespan of the cladding.
Finishing Touches
The final step involves adding the finishing touches to ensure the wall’s functionality and appearance.
Install Flashings: Place flashings around windows, doors, and other openings to direct water away from the building envelope.
Apply Sealants: Use high-quality sealants to fill gaps and joints, providing an additional layer of protection against moisture and air infiltration.
Inspect and Test: Conduct a thorough inspection to verify that all components are correctly installed and perform as expected. Consider using blower door tests and thermal imaging to detect any air leaks or thermal bridges.
Conclusion
Detailing timber frame external walls is a meticulous process that requires careful planning, precision, and attention to detail. By following this step-by-step guide, builders can ensure that their timber frame constructions are robust, energy-efficient, and long-lasting. With the right materials and techniques, timber frame external walls can provide excellent performance while contributing to a sustainable and aesthetically pleasing built environment.